まくまくJavaノート
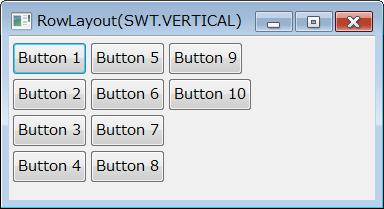
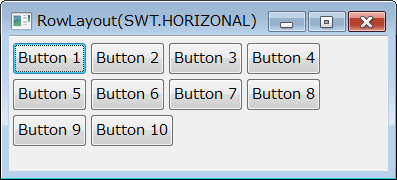
RowLayout を使うと、ウィジェットを縦方向 (SWT.VERTICAL)、あるいは横方向 (SWT.HORIZONTAL) に順番に並べていくことができます。


似たようなレイアウトに FillLayout がありますが、RowLayout と FillLayout には次のような違いがあります。
import org.eclipse.swt.SWT;
import org.eclipse.swt.layout.RowLayout;
import org.eclipse.swt.widgets.Button;
import org.eclipse.swt.widgets.Composite;

public class MyComposite extends Composite {
    MyComposite(Composite parent) {
        super(parent, SWT.NONE);
        getShell().setText("RowLayout(SWT.HORIZONAL)");

        setLayout(new RowLayout(SWT.HORIZONTAL));
        for (int i = 0; i < 10; ++i) {
            Button btn = new Button(this, SWT.None);
            btn.setText("Button " + (i + 1));
        }
    }
}


RowLayout では、デフォルトでは配置したウィジェットのサイズは異なるものになりますが、pack 属性を false に設定することで同じサイズで配置することができます(pack 属性のデフォルト値は true になっています)。
import org.eclipse.swt.SWT;
import org.eclipse.swt.layout.RowLayout;
import org.eclipse.swt.widgets.Button;
import org.eclipse.swt.widgets.Composite;

public class MyComposite extends Composite {
    MyComposite(Composite parent) {
        super(parent, SWT.NONE);
        getShell().setText("pack = false");

        RowLayout layout = new RowLayout(SWT.HORIZONTAL);
        layout.pack = false;  // ウィジェットを同じサイズで表示する
        setLayout(layout);

        Button btn1 = new Button(this, SWT.None);
        btn1.setText("aaa");
        Button btn2 = new Button(this, SWT.None);
        btn2.setText("bbbbbbbbbbbbb");
    }
}


RowLayout では、デフォルトでは配置したウィジェットは左、あるいは上方向に詰めて表示されるため、反対側にだけ余白ができます。
この余白を等間隔に分けて配置したい場合は、justify 属性を true に設定します(justify 属性のデフォルトは false になっています)。
import org.eclipse.swt.SWT;
import org.eclipse.swt.layout.RowLayout;
import org.eclipse.swt.widgets.Button;
import org.eclipse.swt.widgets.Composite;

public class MyComposite extends Composite {
    MyComposite(Composite parent) {
        super(parent, SWT.NONE);
        getShell().setText("justify = true");

        RowLayout layout = new RowLayout(SWT.HORIZONTAL);
        layout.justify = true;  // 余白を等間隔に配置する
        setLayout(layout);

        Button btn1 = new Button(this, SWT.None);
        btn1.setText("aaa");
        Button btn2 = new Button(this, SWT.None);
        btn2.setText("bbbbbb");
        Button btn3 = new Button(this, SWT.None);
        btn3.setText("ccccccccc");
    }
}